What is a GIF?
A GIF (pronounced 'JIF')stands for Graphic Interchange Format and can be used for small animations and low-resolution film clips.Background History
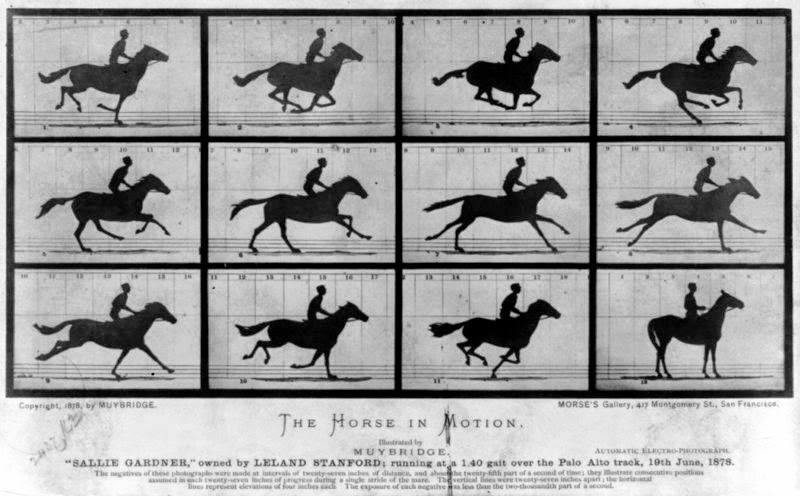 Eadweard Muybridge was a great and famous photographer who later created the Zoopraxiscope which worked by showing a sequence of still photographs in rapid succession. If you've seen Tarzan, it's that wheel of pictures that Jane showed him that spun and the pictures slowly showed the first motion graphics.
 |
| A GIF of a Zoopraxiscope |
GIFs are mainly used on Tumblr since it took up GIF formats. Now you can make GIFs from videos or pics and can be used on almost any website and on mobile devices.

I have seen many GIFs from various websites and have been really curious on how to make one, finally I've had time because this was an assignment that I've actually been hoping for. I started with small things like a walk cycle and then decided to hand draw two more GIFs later on. I'll walk through the easy process to make an image GIF from plain images.

This was the final GIF and this turned out really well, the only thing I would change is some of the positioning and clean it up a bit.
Before you start I suggest having all your images and files ready before you start this tutorial.
How To Make A GIF In Photoshop
<I normally skip the whole new file before you start but this way the file is already fitted to your image.>
Go to FILE > NEW and the box should fit this image. Go ahead and change to colors to RGB for when you save so you won't have to change it later. HIT OKAY.

Next go to FILE > SCRIPTS > LOAD FILES INTO STACK

For my image I used, there should be 12 images selected. The order it is selected in doesn't matter; it will be messed up upon importing. HIT OKAY. Now reorder any layers starting with 1 on top. Make sure all layers are present before proceeding.
Go to WINDOW > TIMELINE
There is a drop down menu in the middle of the timeline bar, make sure it is set to Create Frame Animation and click on create frame animation.
On the top right corner drop down menu CLICK > MAKE FRAMES FROM LAYERS
Here is where reordering will take the longest, reposition the frames so the center is about the same. *Remember to click on the frame and the respecting layer. Any layer before will affect the frames that follow*
CLICK + SHIFT and select all frames, on the bottom of the timeline there is a seconds drop down, change seconds to '0.2 sec'. To the bottom left there is a loop time, change to 'FOREVER'.
Check the sequence by hitting play or the spacebar for a quick run through.

FILE > SAVE FOR WEB
Make sure the formatting is set for GIF

SAVE
To check, go to file and hit the space bar to see the run through.After I started this tutorial I created my own two hand draw GIFs. The process is more complicated and a lot more work but the main steps are still the same.
Both GIFs are from the opening sequence of Avatar: The Last Airbender
This first one is the element water. Its a simple GIF made of 18 frames. Simple lines and I drew faces on the really difficult frames. For both of these GIFs I had help with some friends in animation for the squash and stretch method.

My second GIF is the element fire. I took Azula's frame and added more lines to give depth and drew and colored in the fire. This was the most difficult of the three GIFs I did and fire is a horrible thing to animate.

HAVE FUN

No comments:
Post a Comment